

Customer Master
Customer Master Quick View screen
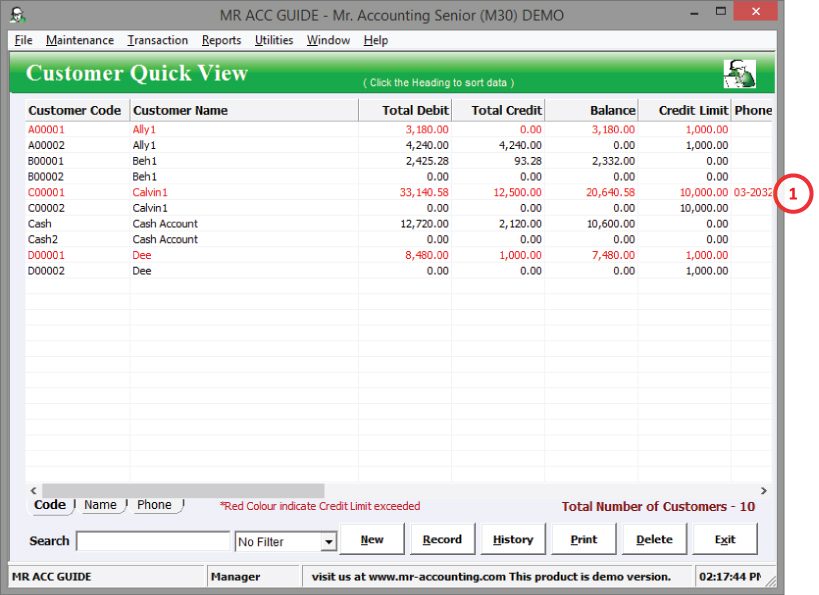
1. A Red customer means that they are over their credit limit
Select New or double click on each customer to edit.
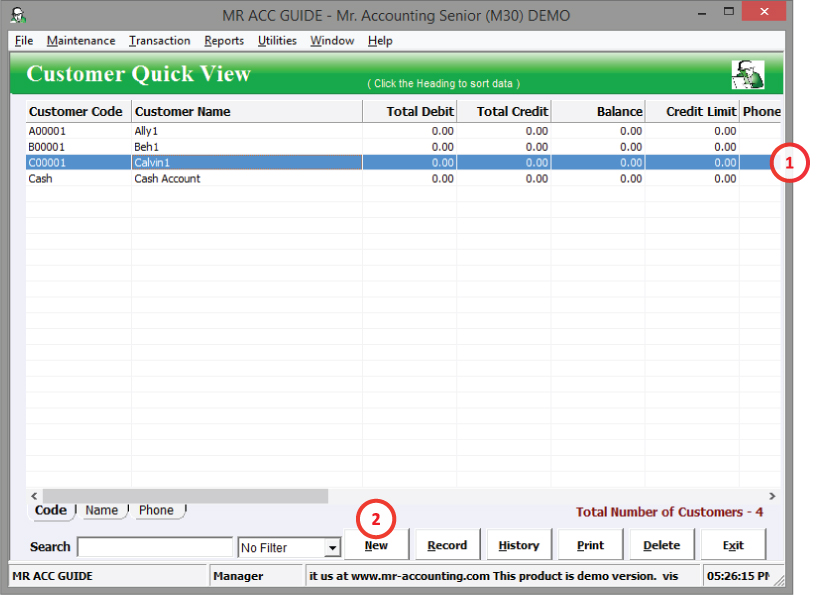
1. Double click to edit customer details
2. Create new customer
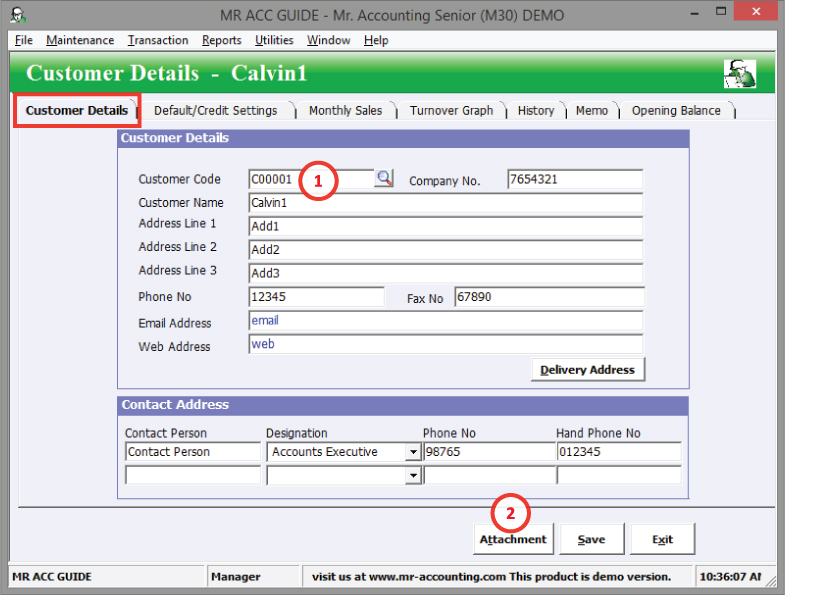
1. Make sure your customer code is correct! This cannot be changed later.
2. Attachment: To attach a file (e.g. Excel file, image file about customer details) for easy access of viewing
3. Delivery Address
Delivery address
You can create additional delivery addresses for your customer, if the goods are delivered to a different address from the company’s main address. For example, the main address may be the office address for this company whereas the delivery address is for the warehouse address.
This keeps a record of the address that receives the stock. However, you still need to set the warehouse that receives the stock using the warehouse code, in the Product Master Default Settings tab and field in the transaction screens under the Invoicing module.
The delivery address button to create and edit delivery addresses is located in Customer Master for customers. The delivery address button for suppliers follows the warehouse addresses created under Warehouse in the Stock Control module.
Select the Delivery Address button.
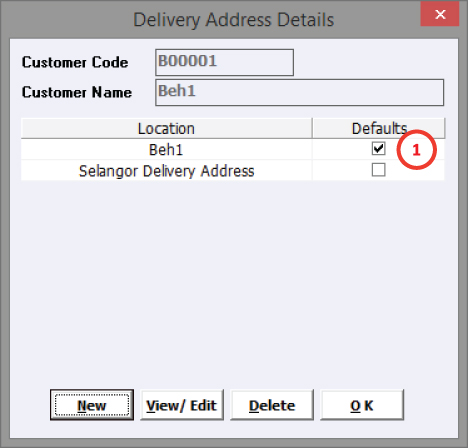
1. Defaults: Tick this to select which Delivery Address is selected by default in the Delivery Address tab under the Sales Order module.
Select New to create a new delivery address, View/Edit to amend the details of an existing delivery address, Delete to delete a delivery address and OK to exit to the previous screen.
The Address Details new window pops out when you select New or View/Edit.
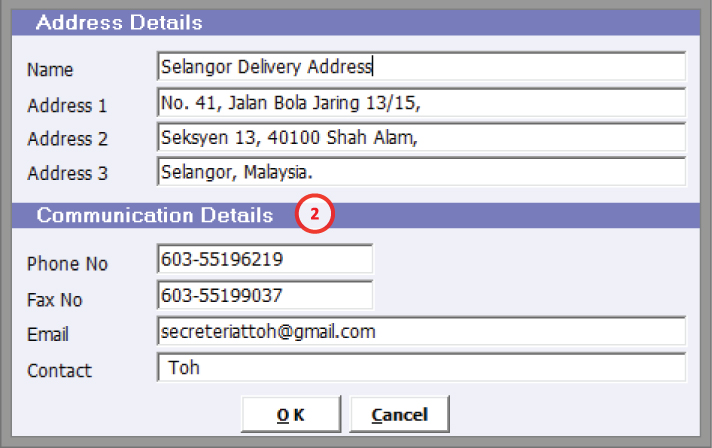
2. Enter the name of the delivery centre, the delivery address and contact details for that delivery centre.
You still need to select the Delivery Address button for transactions under the Invoicing module (e.g. Delivery Order, Issue Invoice) as these still defaults to the main address you entered in the Customer Master.
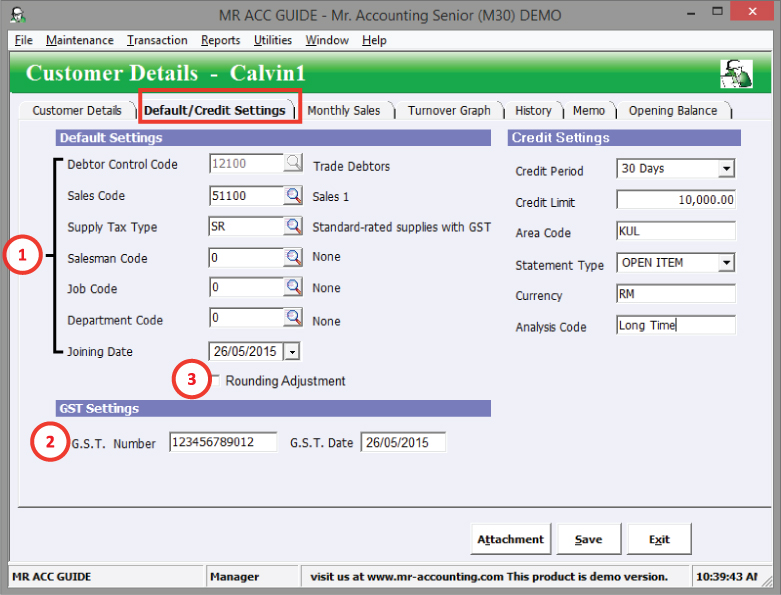
1. Default tax, GL codes, and code for salesman, job and department.
2. GST Number for customer (if available) and their GST registration date.
This is more important for suppliers because GST is claimed back and Customs will chase on this.
3. Rounding Adjustment: Tick to set customer transactions to use 5 sen rounding by default
Default Settings
Supply Tax Code: Set the default tax code for transactions for this customer.
Joining Date: The date when we first sell to this customer.
Credit Settings
Credit Period: Maximum period to receive payment (this is displayed when you select a customer for an invoice under the field Terms). Type C.O.D. (Cash on Delivery) here for a cash-based customer.
Credit Limit: Maximum amount of credit (owed money) given (example below).
Area Code: Code for the area of business
Statement Type: To adjust the format of report printed for this customer
Currency: Keep a record of what currency this customer uses
Analysis Code: An additional code (can be used for special customers etc) to categorise customers to filter in reports (e.g. in Customer Statement and Customer Ledger)
Credit Limit
This is the maximum amount of owed money (credit) we allow for this customer.
The customer will be red in colour in the Customer Master if the credit limit for this customer is exceeded to alert you [see example below].
However, transactions are still allowed.
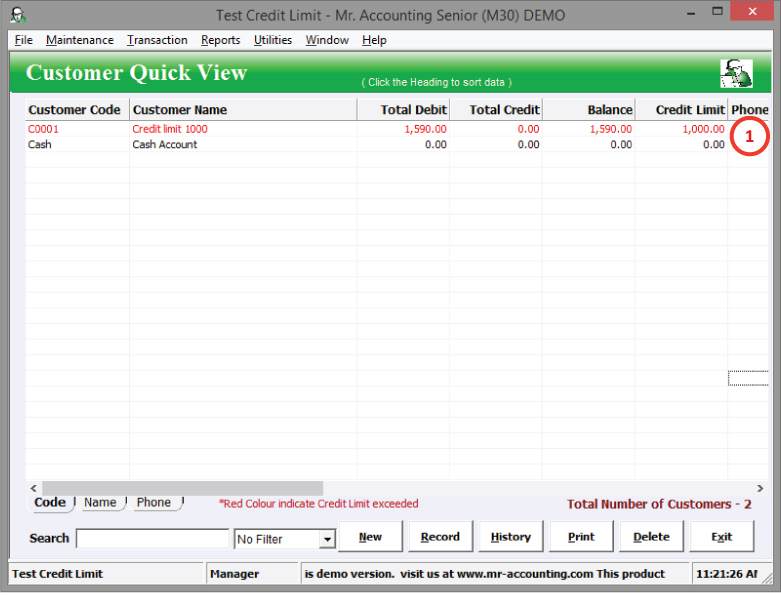
1. The outstanding balance of 1590 has exceeded the credit limit of 1000 and the customer becomes red.
Statement Type
This is the report format for Customer Statement [see examples below].
There are three formats: Balance Forward, Open Item and None.
Balance Forward
This will add up all transactions in previous accounting periods under the heading “Balance Forward”.
Example: Customer 2 selected Bal Fwd as statement type.
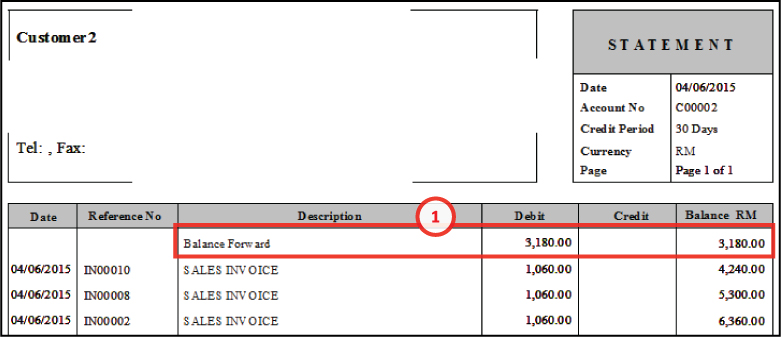
1. Invoiced amounts in financial period 2013 and 2014 are added up and put under a Balance Forward heading
Open Item
Invoices from all accounting periods are displayed in the customer statement.
There is no “Balance Forward” heading that adds up invoiced amounts for previous accounting periods.
Example: Customer 1 selected Open Item as statement type.
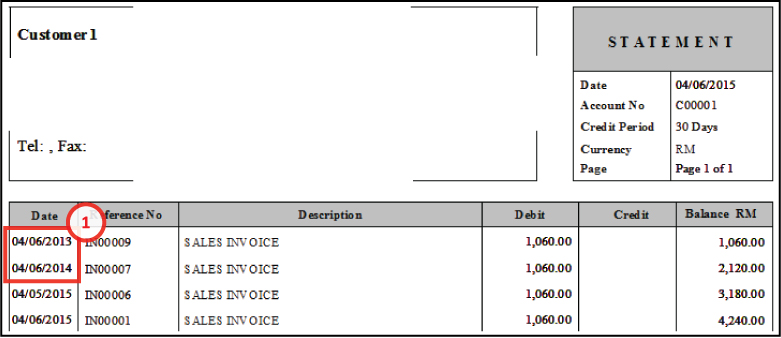
1. Invoices from previous accounting periods are included in the customer statement (not under Bal Fwd heading)
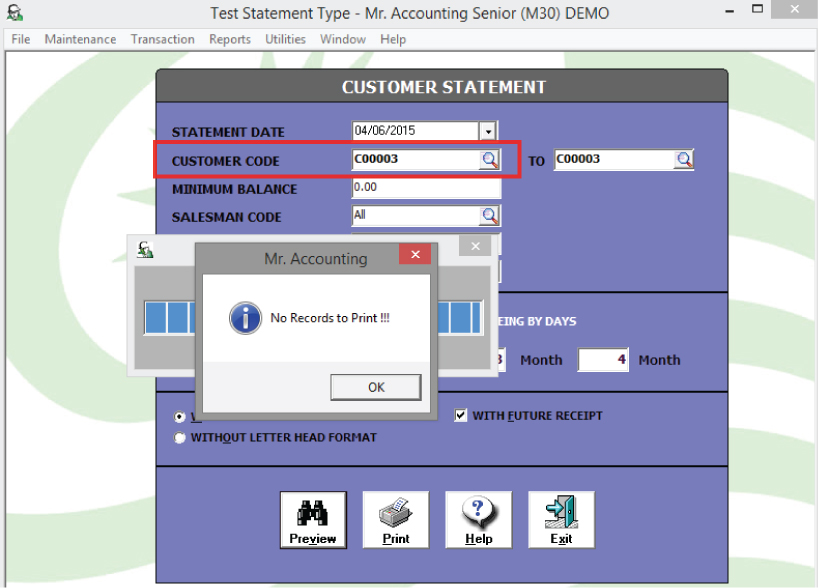
None
This customer will not be included in the customer statement report (use this to exclude customers).
Example: Customer 3(C00003) selected None as statement type. There will be no records to print even though this customer has many transactions.
This shows the total invoiced (e.g. from Sales Entry and Issue Invoice) and receipt amount for each month in this accounting period, and a total amount for the previous and the next (future) period.
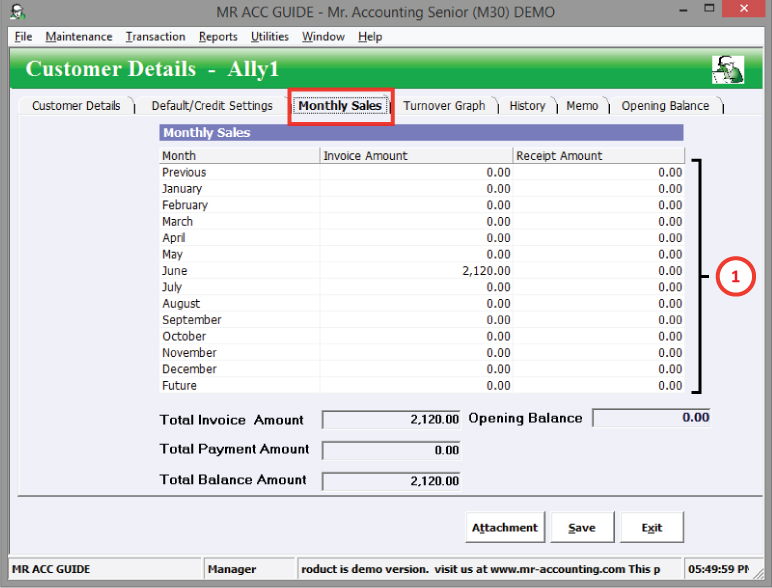
Note: Transactions under Issue Cash Sales are recorded under Invoice Amount and also Receipt
1. These months will change based on the accounting period.
Example:
1/6/2015 – 31/5/2016 will make the months change to June to
May
This shows total sales (turnover) for each month in this financial period and next financial period. This is used for analysis for management purposes.
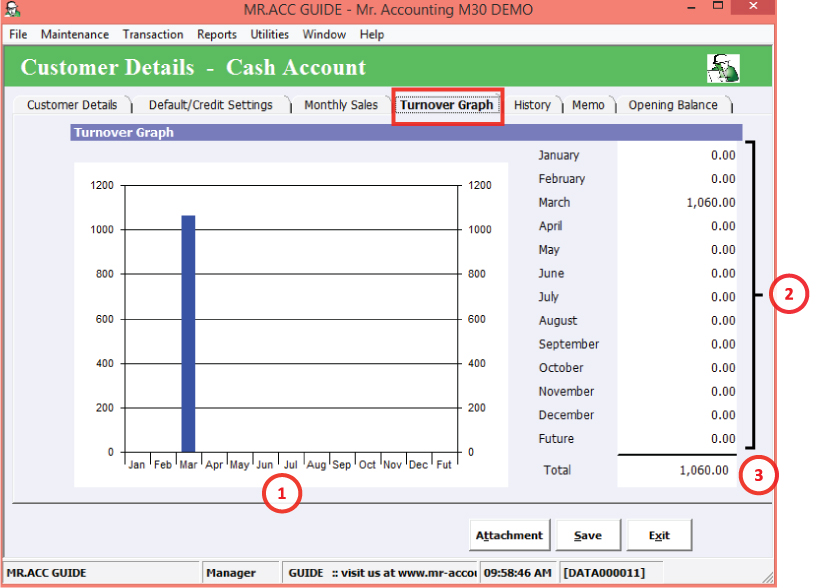
Tip: You can use PrtSc key on the keyboard to copy an image of the graph to put in your Powerpoint slides.
1. Bar chart that shows sales for each month
2. Sales for each month (from Sales Entry, Cash Sales, Invoice etc)
3. Sales after this financial accounting period (e.g. for next year)
This shows all transactions for this customer. It is similar to History button in Customer Master.

1. The new window contains more details about GL and tax codes, as well as tax amount and sale amount (without tax).
2. Did You Know? You can double click on an item to open a new window.
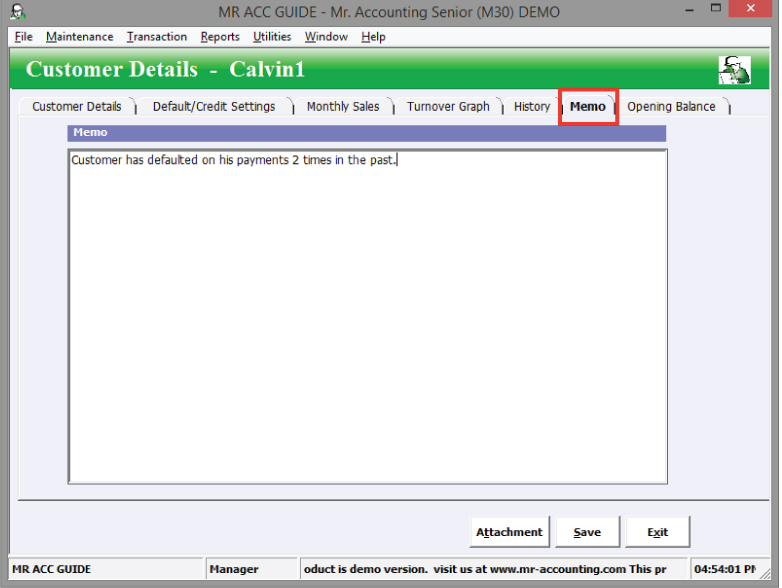
You can enter additional details and remarks for this customer here (other than those
already keyed in under the Customer Details tab above).
If you are continuing your accounts from another software or you first start using accounting software (i.e. previously you done bookkeeping on paper), you may have outstanding invoices for each customer from the previous period.
You should key in outstanding invoices for each customer in their respective Opening Balance tabs.
How to key in outstanding invoices under the Opening Balance tab?
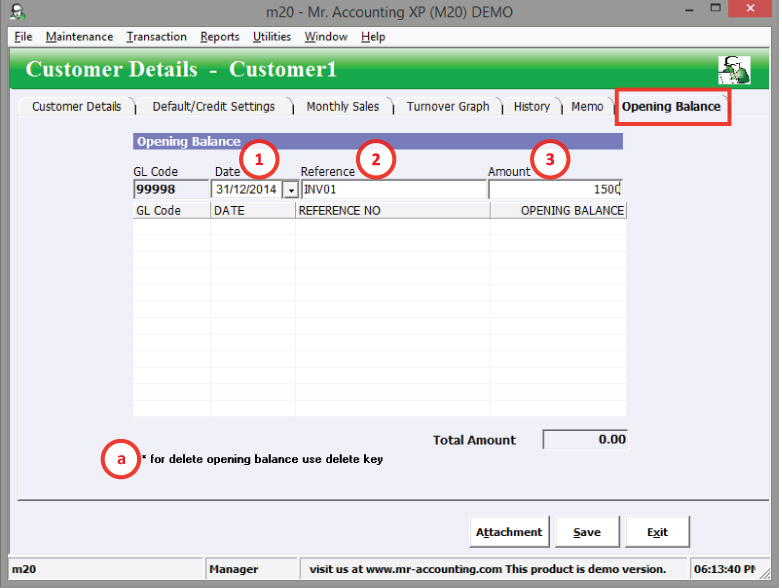
1. Step 1: Date is the day before the first day you start using Mr. Accounting.
Example: Start using 1/4/2015 Date should be 31/3/2015
2. Step 2: Enter reference as INV01, 02 etc (key in all outstanding invoices)
3. Step 3: Enter amount outstanding for the invoices. Press Enter to add the item to the list.
a. To delete the entry select the entry and press the Delete key on the keyboard