

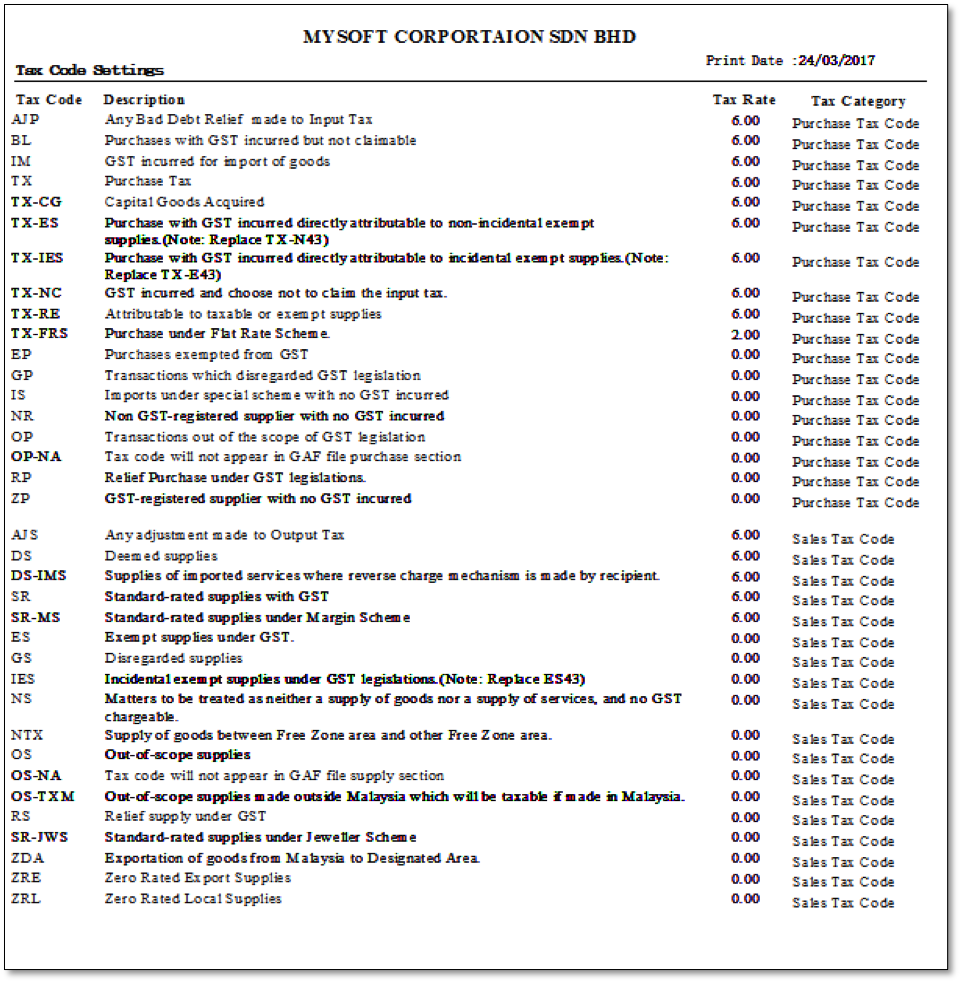
Tax Setting
This screen displays the
preset tax codes that are based on the recommendation by the Malaysian Customs.
The tax codes can
be divided into
purchase and
supply tax codes. The tax codes under Both are old tax
codes for Sales and Service tax which should not be used.
The default preset
tax codes, description and tax rates are as below:
Note: Tax codes are only suggested by the
government and used for their tracking purposes. It is recommended to use the
standard tax codes recommended by the government, but the most important thing
is to ensure that the final tax payable/refundable figure is accurate in the
GST-03 Return form.
Tax Settings Quick View screen
1.
Tax Amount: This is the total tax that has not been reconciled
and submitted in the GST Return.
2.
In Use:
see below
3.
Include Submitted Transaction: Tick to include transactions that are already submitted in
the GST-03 form
4.
Transaction: see below
5.
Print a summary of tax
codes details (tax code, description, tax rate, input and output GL code
etc)
6.
Delete the
tax code (be careful
not to delete important tax codes)
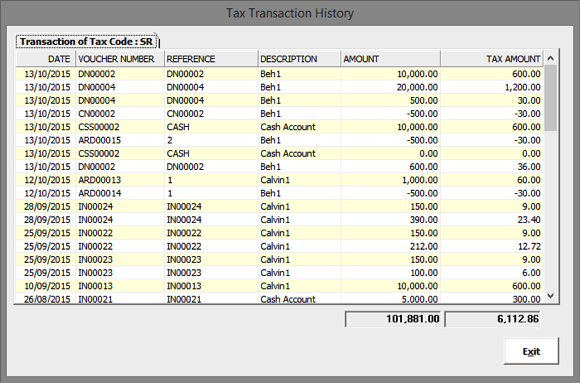
You can use the Transaction button
in the Quick View screen to display a list of all transactions with the selected
tax code. You may need to use this function to check why there is an outstanding
tax amount even after you have reconciled and submitted the GST Return form.
Step
1: Select the tax code that you
want the history for (e.g. SR)
Step
2: Select the date range to be
included
Step
3: Select the Transaction
button
A new window pops
out showing the transaction history for this tax code as below.
Double
click on tax codes or select a
tax code and select Record.
Example:
edit TX tax
code under Purchase Tax
1.
Include in GST Return: Tick to include the amount for this tax code in the GST
Return form
2.
Tax Memo:
This provides an explanation of the tax code
3.
Tax Link to GL: see below
4. Show in Search: see below
Tax
Code: Enter the name of the tax
code
Description: Type in a description that will appear in the Quick View
and in the magnifying glass selection screen
Tax
Rate: This is to configure the
tax rate for this tax code. This is used to calculate the tax amount for
transactions using this tax code. The current rate is 6% for GST chargeable
transactions and 0% for transactions not chargeable to GST.
Tax
Category: This
is to set which field in the GST Return form
that amounts for this tax code are posted to. For example, if you set this to
“GST-Std Rated” and “Supply Tax Type” then this amount is posted to the 5a) and
5b) fields in the GST Return.
Tax
Type: This
categorises the tax code into either purchase or supply. This affects the
transactions that you can tax code under. For example, if you select the Supply
Tax Type, then this tax code can only be selected under sales (i.e.
customer-related) and receipts transactions such as Cash Book Receipt,
Sales Entry
etc.
General Ledger Posting: This
is to set which GL code the amount for this tax code is posted to. This GL code
is a control account for input tax/output tax under 3. Liabilities, or
disallowed from claiming tax account under 7. Expenses.
Note: The GL
posting is not
the same as the tax category field above.
GL posting affects
the GL code for posting tax amounts in the General Ledger, whereas Tax Category
affects which field the amount is posted to in the GST Return form in the GST
module.
Only those Tax Codes
that have been ticked for Show in
Search will show up when you click on the magnifying
glass to select tax codes [see example in Cash Book Payment below].

1.
These tax codes all have “Show in Search” ticked. If not
ticked, they will not show up here.
If Show in
Search is ticked, then the In Use column in the Tax Settings Quick
View screen will be ticked also.

You can use
this function to link a tax code to an income or expense GL code, which means that this tax code
is automatically selected after you select the linked GL code.
Example: Link
the OP
tax code to director fees
GL code (an expense item)
Step 1: Double click on the OP tax code to edit
Step
2: Select GL code [in red box]
to link with the tax Code using magnifying glass (e.g. 71300 Directors Fees)
Note: You
can use the Add and Remove buttons to add and remove GL codes from this
list.
Step 3: Save the transaction
After you have linked the tax code (OP) to director fees
(71300):
When you select
Director Fees as 71300 in GL code in Cash Book Payment, then the
Tax Code will be automatically set to OP.
Step
1: Enter 71300 in GL Code
Step
2: Tax words will be
blue and Tax Code automatically set to OP
This prevents you from using the wrong tax
code for that GL code, and saves you data entry time.