

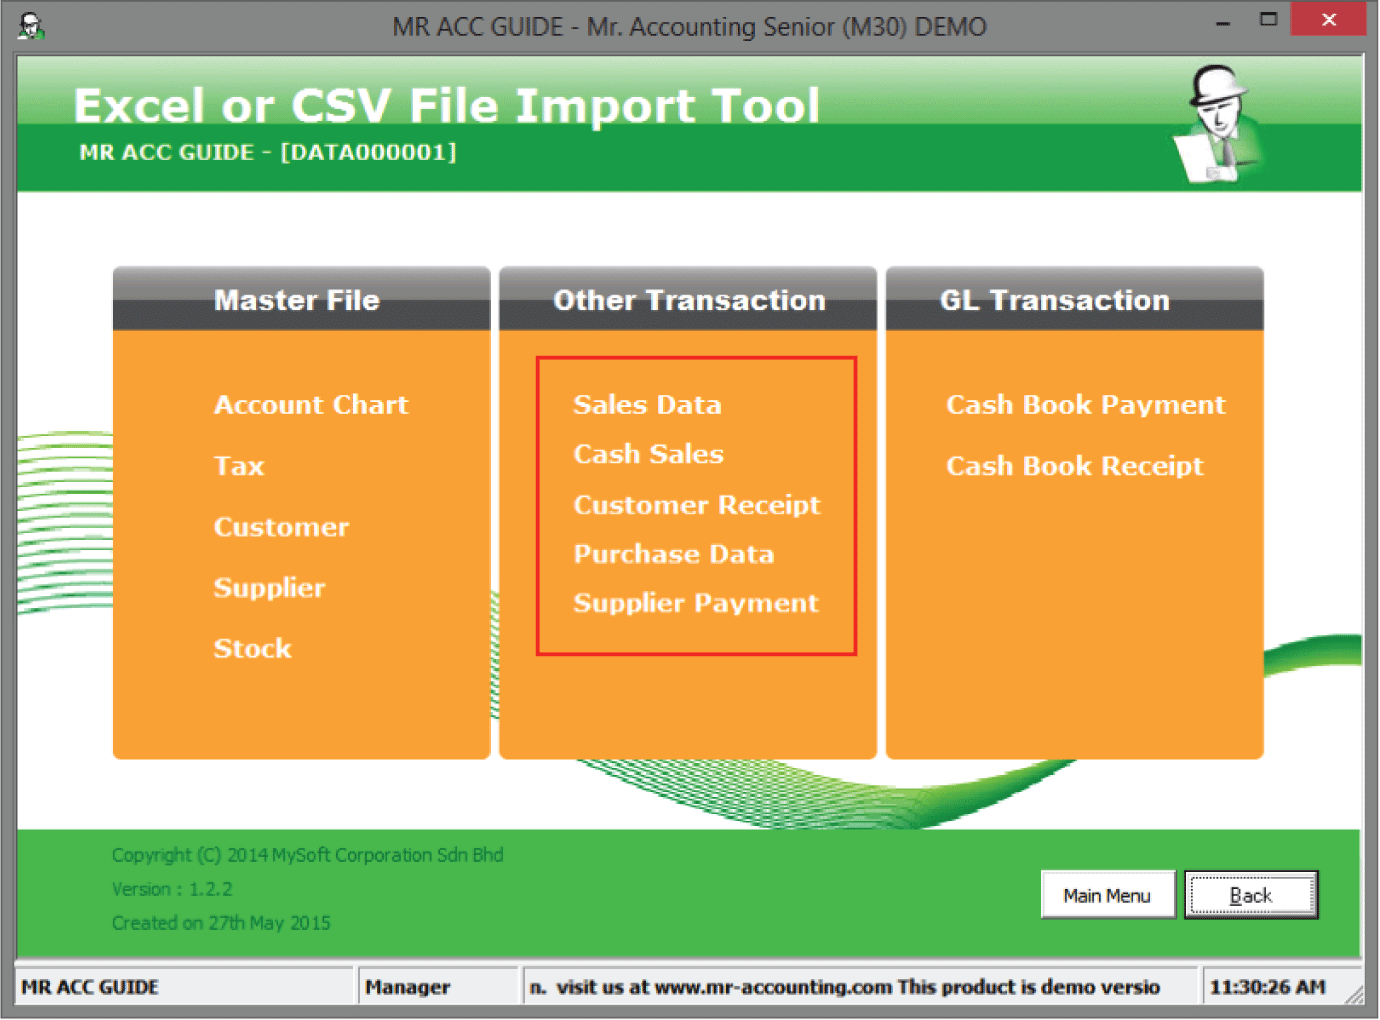
Import Module
You can use this tool to import Master files or
transaction data from other software into the system. The most commonly imported
master files are the Customer, Supplier and Product (Stock) master files [see
red box below].
Excel or CSV File Import Tool Main Menu
screen
It is recommended that you only import the master files from your old software. You
are not recommended to import all transactions because the chances of your
database being corrupted are higher when more data from transactions are
imported.
Instead of importing all transactions, you can import
only the master files and then key in the opening balances for customers, supplier
and general ledger.
(Refer to the blue Mr Accounting guide book on how to
key in opening balances)
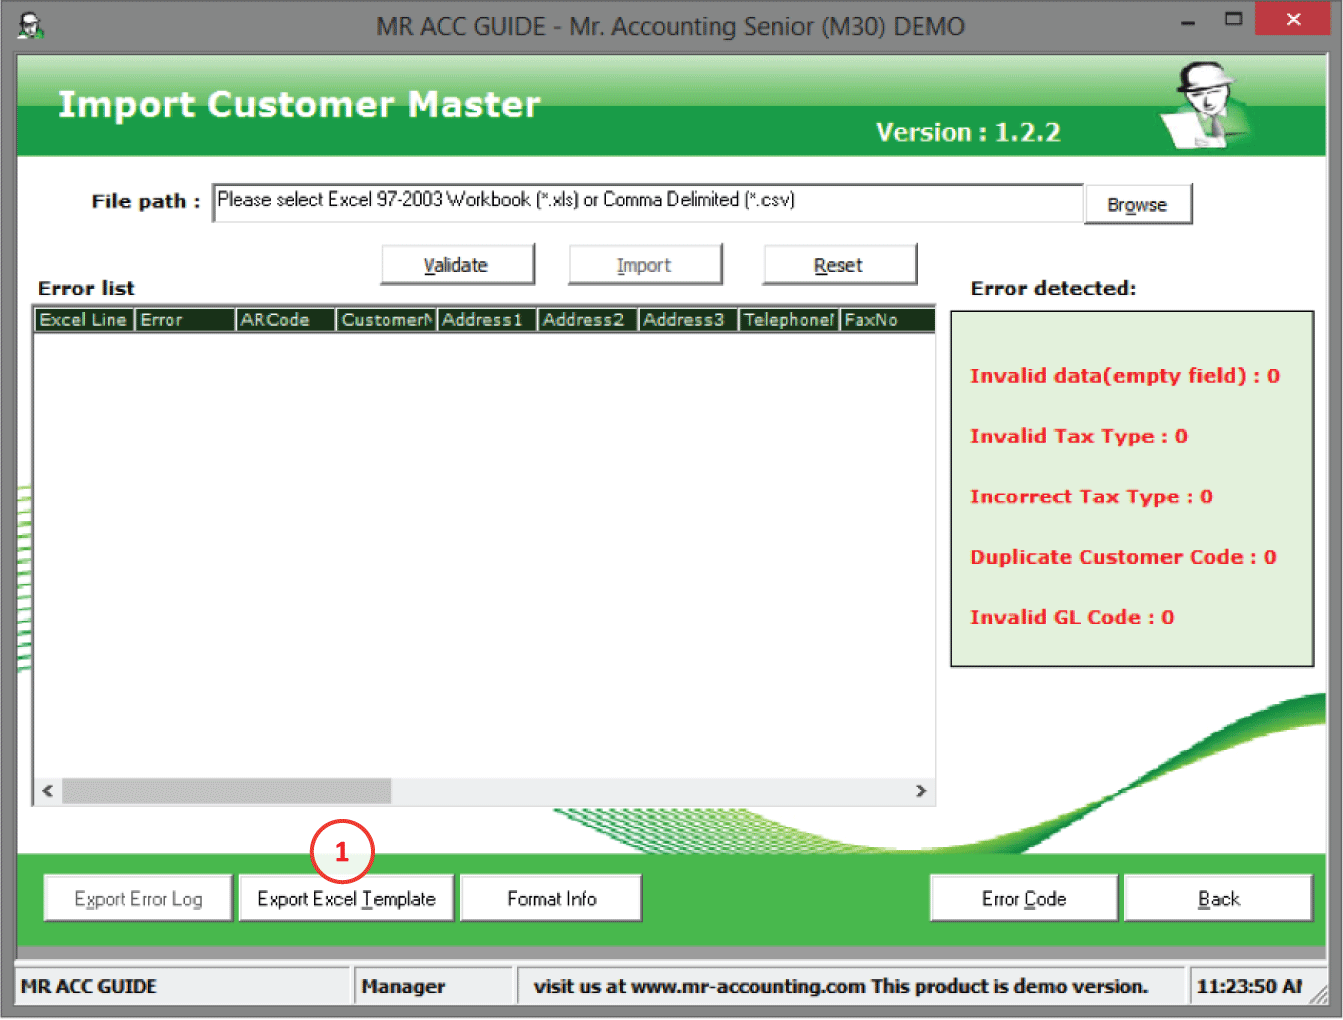
After selecting a file that you wish to import, you will enter into a Quick View screen.
Example of
Import Tool Quick View screen (for Cash Book Payment under GL Transaction column) : You can refer to this screen for an overview
and explanations for the use of each
button

1.
You can double click on the error code to show a description of
their meaning
2.
You can see a summary
of the errors in the Error list and
the type of errors under Error
detected
Browse: Select this
button to locate your Excel template file to be imported (you need to generate
one first then fill in the data according to the
columns)
Validate: After
selecting the Browse button and
selecting your Excel template file, click on Validate to check if there are any
errors in the template (these errors will show up in the error list
below)
Import: Select this to
confirm import of data into the Mr Accounting system. You can only Import if
there were no errors detected earlier when you selected Validate.
Note: You can still import if there errors related to the tax
amount
Reset: This clears
the file path above to import a new file
Export
Error Log: You can use this button to export the
error list above into an Excel spreadsheet
Export
Excel Template: Before you can begin to import, you
need to select this button to generate an Excel template for the selected master
file or transaction. After generating this template, you can open it and arrange
data from the other software into the columns in the template. After this, you
can then select this file to import into the system [see the example on the next
pages].
Format
Info: This opens a new window that lets you know
what type of data (e.g. date, currency, string etc) and the maximum length and
decimal places for that field [see example
below]

Error
History: You can generate a report showing the
history of errors filtered by the selected
data

Error
Code: This opens a new window showing a list of
error codes and a description showing their
meaning

Example:
Importing a list of customers from the other
software into the Customer
Master
Go to Import Module
→ Customer
You need to generate an Excel template which contains
many columns that you can arrange data
into.
Step
1: Select Export Excel template to generate an
Excel template file.

Step
2: Open the Excel template in Microsoft Excel. The
template is empty when you first open it

Step 3:
Export the customer list from other software into an
Excel list. From that list, copy each column to fill in all relevant
fields.
For example, copy the column for customer code from
other software and paste it in the first column Customer
Code
Step 4:
Scroll right to fill in all remaining fields,
particularly those compulsory fields
with *.
a.
If you
see an asterisk (*) at the left of the field, then this is a compulsory field that needs to be
filled up. It cannot be left blank.

Step
5: Select the Office button on the top left corner
and then select Save As → Excel
97-2003 format [see red box below].

Step
6: Select your directory and file name then
Save.
a.
Select your directory
b.
Key in your File
name
c.
Make sure it is 97-2003
format
d.
Save the file
Step
7: Close
the Excel file and go back to the Customer Import screen.

a.
Note: If there are errors, then they appear in the
list below. You can double click on
the error code for a description of
the error.
Step
8: Select the Browse button then choose the Excel
template file (this should end with .xls)
Step
9:
Select Validate to check for errors
which will appear in the Error list
below
Note: If there are errors, then you need to correct
them in the Excel template first.
For example, if there is a duplicate code, then use a
different code. Then save the changes to the Excel template and select Validate
again.

Step
10: After correcting all errors, a success message
should pop out after selecting
Validate. Select OK.

Step
11: After validating successfully, select Import to import the data into the
Customer
Master.
Step
12: A success message should pop out after selecting
Import. Select OK.
DONE! Now go to the
Customer
Master to check your data [see
next page].
The Customer Master has been populated with the list of customers, indicating that the import from the template file has been successful!

Q1: Why does the message “You tried to
commit or rollback a transaction without first
beginning a transaction” appear after selecting Validate?

A1: In the Excel file some cells may have
a number format. This will appear on
the right side of the cell
[highlighted in yellow below].
You should convert these into a text format as the Import Tool only
supports text format.
Numbers stored in a text format have a small green triangle on the top left corner and are arranged on the left side of a cell [see red box below].
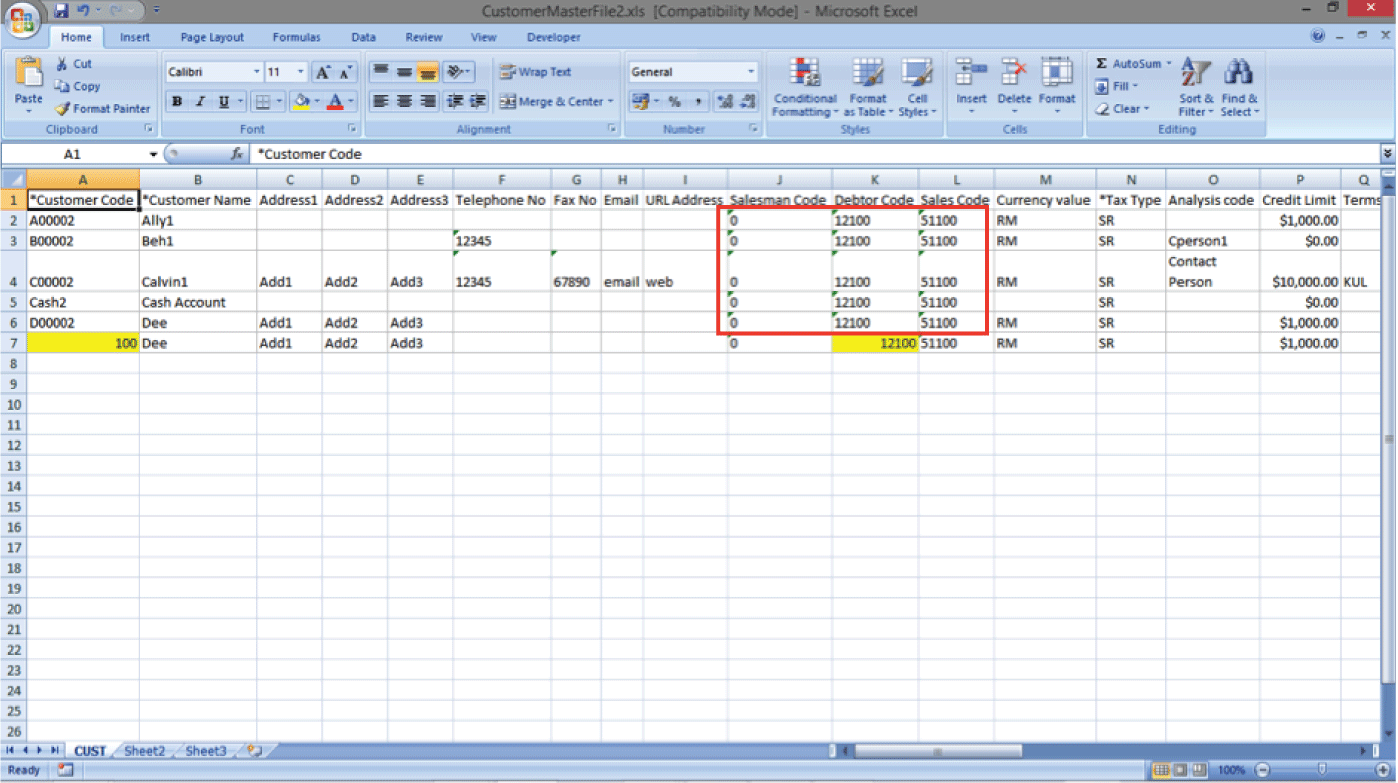
How to convert a number
format to a text format?

Step 1: Select the column that you need to convert to
text
Step 2: Select Text to Columns under Data Tools. A new
window opens as below.
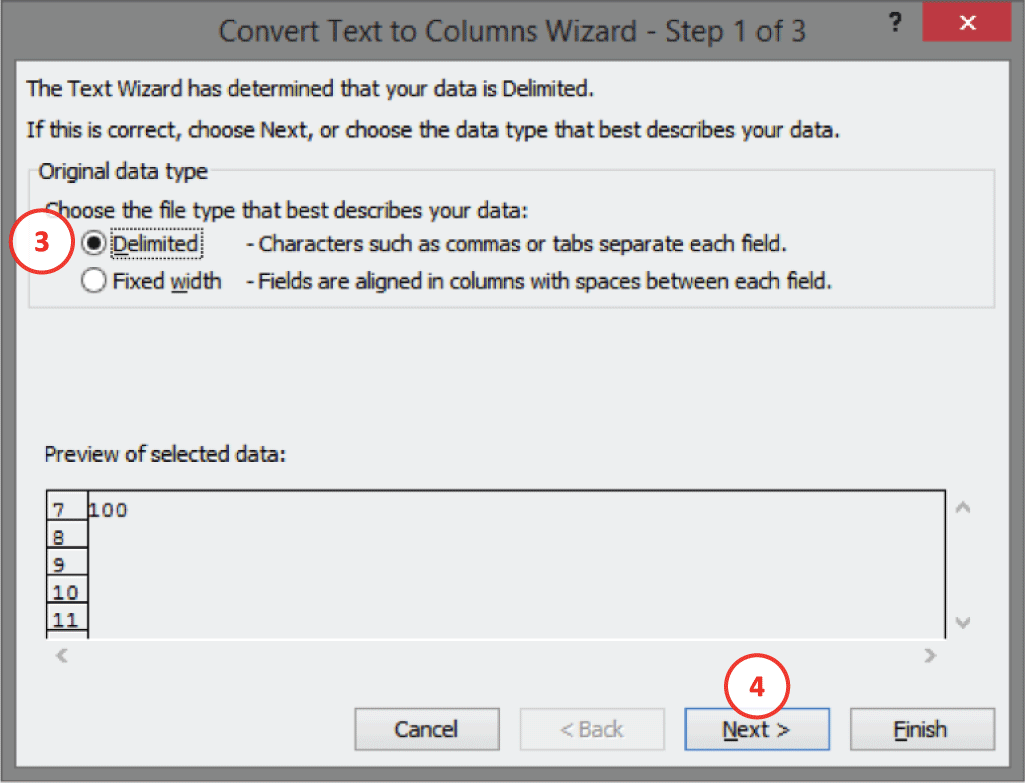
Step 3: Choose
Delimited
Step 4: Select
Next

Step
5: Select
Next

Step 6: Select
Text
Step 7: Select
Finish

Step 8: This column should be converted
into a text format with a green
triangle on the top left hand corner
Step 9: Repeat the steps above for all
other columns with a number
format
After converting to text format, a success message
should pop out after you select Validate as
below.

Q2: Why does the message “The field is
too small to accept the amount of data you attempted to add. Try inserting or
pasting less data” appear after selecting Validate?

A2:
The cell data length in Excel was too long for one or more fields.
You can check the maximum field length for each field
by clicking on Format Info [in red
box].

1.
You can scroll down to
see the max length for each field
Please check the Excel file and
shorten (truncate) the fields that seem too long [e.g. highlighted in yellow
below].
You can truncate using the Excel
formula like “=LEFT(B7,50)” for a maximum length of 50
characters.

After truncating, the length should be exactly 50
characters. Now go back and try importing
again.

You should see a success message after selecting Validate.

Q3: Why does the message “XXX.xls has
been imported on XX/XX/XXXX” appear after selecting Validate?

A3: You cannot import the same Excel file
into the same company twice. This is
to prevent duplication of data.
Q4: Can I use the ‘ (apostrophe) key
(beside Enter) in Microsoft Excel?
A4: Yes. But these apostrophes will be
converted to the ` (left tick) key (above Tab key and beside the number 1 key)
after they are imported into Mr Accounting.